martes, 30 de diciembre de 2014

How To Download/Install Kik Messenger For PC/Laptop Windows XP/7/8/8.1

In one of my previous post I wrote about how to install Showbox movie app on PC. In today's my article I am going to explain you about how to download Kik Messenger for PC. Kik Messenger is one of the best social application that is used by most of the users. Kik was founded in 2009 by a group of students at university of Waterloo. It's a multipurpose application that provides you a way to communicate with your friends. You can easily share images, videos, smiley and much more.
Download-Kik-Messenger-For-PC-Mac
We can't download or install Kik Messenger on the computer directly because there is not any direct software available of it. You will need Android Emulator and apk file of Kik Messenger. If you are completely unaware about all these then don't worry I will be explaining each and everything in this post.

Kik Messenger For PC Free Download (Windows XP/7/8/8.1)

Features Of Kik Messenger

  • Kik Messenger offers built in browser capability. 
  • You can send text, images in real-time and can use awesome tools such as sketch pad and built in browser.
  • Kik Messenger is uniquely designed as it offers simple, elegant and easy to use interface.
  • Kik Messenger is freeware, free to use.
  • One can share images, videos, real-time location, voice notes and much more.
  • It's available for both iOS and Android platform.
  • You are eligible to send unlimited free text messages to any Kik user.
  • Kik Messenger is designed to load in seconds so that one can experience best performance social app.
  • You get real time notification when someone is typing.
Read Also :- How To Download Showbox For PC/Laptop Windows 7/8/8.1

Install Kik Messenger On PC/Laptop - Download Kik For Windows XP/7/8/8.1 

As I said earlier you can't install Kik Messenger directly on your laptop. You will need Emulator program to install and run Kik. You can use Bluestacks App Player it's one of the best emulator available online and you can get it free of cost. 
  • Download and install bluestacks app player from below link otherwise you won't be able to run Kik messenger on your computer. 
  • When the installing process is done, open it from either shortcut of bluestacks on desktop or from search box. 
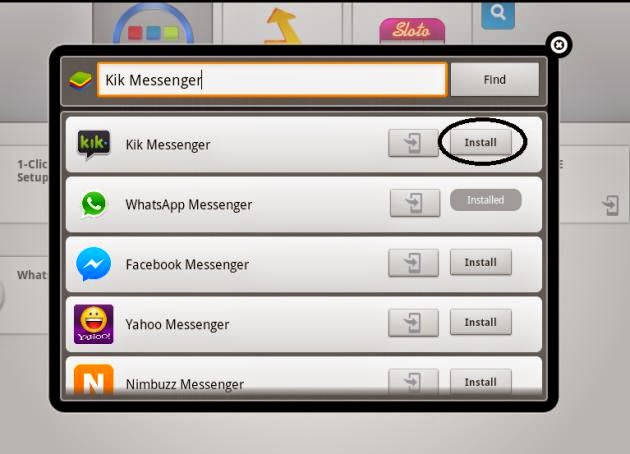
  • Now you will see a orange search button at the top left corner of bluestacks. Now type "Kik Messenger" as it is.
Search-For-Kik-Messenger
  • Now don't press enter button, click on "Search play for Kik" to install Kik for PC. Be careful while performing this action.
Playstore-Kik-Messenger
  • It will take you to the play store and there you can see Kik Messenger, just click on install button and wait for the process to complete.
Install-Kik-Messenger
  • That's it, now icon of Kik Messenger will be created simply click on it to log in and use it.

Method 2 >> Install Kik Messenger On PC Using Bluestacks (Apk File Method)

There is an alternative if you feel insecure in searching app. You can use directly download apk file of Kik Messenger from play store and then install it in bluestacks app player.
  • First of all copy the link of the Kik Messenger app from play store.
  • Then go to this link http://apps.evozi.com/apk-downloader and paste that url and click on generate apk file.
  • This will generate apk file which you can download easily.
  • Now go to the location where this apk file is saved and click on it to install in bluestacks. 
  • That's it, now you will be able to see Kik social app in bluestacks.

Method 3>> Install Kik Messenger For PC/Laptop (Without Bluestacks Using Youwave Player)

Read Also :- 4 Android Apps To Earn Free Talktime
 
This method is similar to the first method but the problem is that this software (Youwave player) is not free as bluestacks app player is. But you can get a trial of 14 days of Youwave android emulator. Just download the software using below link.


After the downloading process is complete, just open it to install in your PC or Laptop. Now search for Kik app in the software and install in it. That's it. 

Method 4>> Install Kik Messenger For PC/MAC Using Andy

This is another alternative of bluestacks. If you are going to use this method then you should have working internet connection and you should update graphics driver of your PC to the latest version. Now follow the steps given below to install kik on computer.
  • First of all you will need to download Andy software on your PC or Mac. Download it using below link.
  • When the download process is complete simply click on install button to install this software in your PC or MAC.
  • After the installation process is complete, just open play store and search for Kik Messenger there.
  • Install it and that's it, now you will be able to see Kik App in Andy software.
This was all about how to install kik messenger in my computer. Feel free to comment below if you have any problem regarding the article.
Share:

domingo, 28 de diciembre de 2014

Ultimate Pack Of 10 Tips To Make Your Blog Popular In 30 Days

All the newbies wants to know about the work of professional bloggers or about those bloggers who are success in this field. They wants to know about those tips & tricks which worked for the professional bloggers. This provides them a way to grow their blog quickly ! "How to make your blog popular", I have seen this question at several places in different ways such as how to make my blog popular or how to make a famous blog. The way of asking of question is different but if you will ask me then I will just say two points which will describe it very well.
Make-Your-Blog-Popular
  • Smartness and Hard Work is required in blogging.
  • Before starting create a schedule and follow it till the end.
Making a famous blog or popular blog is a dream come to true for a blogger. I know it's not a child play to make a famous blog but if you have started doing this work and are hardworking and smart then success is your my friend. 

You can't make your blog popular overnight. I have seen some newbies spamming over the social networking. Beware !! don't do that it will never make a reputed blog rather it is considered spam and really sucks. If you will pay a little attention to list of famous blogs then you will note that all are at that position because of hard work of bloggers. Below is a list of some tips to build a popular blog.

Read Also :- Yosemite Premium MyThemeShop WordPress Theme At 50% Off

How To Make Your Blog Popular

1. Write Quality Content
This is the first step towards your success. Always try to write top quality content that will bring the attention of people towards your blog. This is the thing that can turn a new visitor into a regular blog reader. When you share top and high quality content then people share it more and more and your blog grows quickly. 

Most of the newbies are focusing only on writing 500+ words for SEO. My friends you are writing for your readers not for Google's crawlers. Those crawlers are not going to read your blog. Write for your audience that will help them.

2. Make Your Blog More Attractive
Always keep one thing in your mind that now a days people loves attractive things. They love to spend time on attractive looking things. If your blog is attractive then they will spend more and more time on your blog that simply increases engagement of audience. Follow the tips below to make your blog more attractive :
  • Use CommentLuv Premium Plugin on your blog to make people feel attractiveness in your blog and to increase audience. 
  • Make your site load faster because people don't have this much time that they will wait for the loading of your site.
  • Choose only that theme that suits your niche.
  • Always stay away from pop up ads because it distract readers.
3. Stay Active On Social Media
Social media also play a vital role in building a famous blog. If you will use it in a proper way then it can help you to make your blog popular in less than 30 days. Don't ever try to use spam tricks to boost your following on social media then will not attract users toward your blog rather you will lose the trust of the readers. 

Use working methods and white hat techniques to increase your fan following and try to stay active and helpful on social media that will be really helpful.

4. Blogging Communities
Will you believe ? If I say that you can get huge traffic for free, No you won't. But the fact is that you can get free traffic and you will believe in it just keep reading. Blogging communities are some sites which can drive huge traffic towards your blog if you rank on the home page of these sites. You can join them and try to get some crazy traffic. Below is a list of blogging communities that I use personally :


5. Giveaways And Cash Contests
Giveaways are one of the best method to grab thousands of audience. These two methods can boost your traffic in just one day. You can organize either any giveaway or cash contest to drive traffic towards your blog. 

Now a days there are sites available online that your can use to manage giveaways and contests. Below is a list you can use :
  • Raffelcopter
  • PunchTab
Read Also :- How To Increase Download Speed In IDM Upto 20%

6. Guest Blogging
As you know that building backlinks helps you to increase your blog's traffic. More and more high quality backlinks; more is the traffic. But when you get a backlink through guest blogging then it helps more than anything. Always try to write some guest post on another websites in a month. According to me guest blogging is the best way to build relationship with other bloggers, building backlinks and then driving traffic towards your blog or website.

Always read the guideline of that site where you are trying for guest post. Be aware about the guidelines of the site and write according to only that. It will help you in approving your post very soon.

7. Live Events and Webinars
If you are a good speaker then you can go for live events and webinars. Because most of the newbies are unaware about blogging. These newbies are always excited for some live events because these webinars can help them a lot to build a carrier in blogging and you can get traffic on your blog. 

Arrange some live events in your city and know about the problems of the bloggers. Always try to be helpful towards them because it builds a trust towards you and your blog. 

8. Write About Tutorial Articles
This is also a working trick to get some decent traffic for lifetime. the reason behind this is that articles related to tutorials get never old. They are evergreen and can drive traffic on your blog for lifetime if you have a good back-linking.

9. Building Email List
This is the thing which a blogger should start from the day he started blogging. If you are serious about why your subscribers are leaving your blog then just try to give them some offers which can bring them back. If one have a good list of loyal subscribers then one have a traffic that will stay forever.

10. Commenting
Last but not the least commenting is also a efficient way to get high quality traffic. Find some high PR websites related to your niche and build some comments on them. 

Keep one thing in mind that your comment should be related to that article and should be helpful to the readers because only then you an drive some visitors towards your blog.  
Share:

sábado, 27 de diciembre de 2014

How To Download Showbox For Windows 7/8/8.1 PC/MAC

Hey friends, today in this article I will explain you about how to download Showbox for Mac/PC on windows 7, windows 8 or windows 8.1? I got hundreds of request to post about this tutorial. This tutorial will simply tell you about how to download Showbox movie app on PC/laptop/Mac
Showbox For PC
Showbox is an app which has amazing collection of Movies and TV-Shows. And all these is available for free. You can enjoy any movie or TV-show on your PC/Mac/Laptop absolutely free. The thing that you will need is a high speed internet connection. Now you don't need to hang around on the internet for the latest movie. Just search any movie or program within the app and enjoy. Simply follow the steps below to download and install Showbox free app on your PC or laptop.

Read Also :- Ultimate Pack Of 10 Tips To Improve Your Internet Safety

Show box For Windows 7/8/8.1 - Download Showbox For PC/MAC

This Showbox app is not available in the play store. So you can't simply use it on your system. To use Showbox app you first need to download emulator on your PC or laptop then install the apk file of Showbox in emulator program. 

You can use BlueStacks emulator as it's free and recommend by so many users. It's one of the best emulator available online. Download and install bluestacks emulator by below link.

Download Showbox For Windows 7/8/8.1 - Showbox For PC/Mac/Laptop

To use Showbox on your mac or laptop you will need to install apk file of Showbox app in the emulator. You can easily download apk version of Showbox movie app for free from below link.


Read Also :- 3 Ways To Create Free WiFi Hotspot In Windows XP/7/8/8.1

After downloading the file from the above link go to the place where you have saved this file on your system and open it with Bluestacks Apk Handler. It will install this apk file automatically. 

Open With Bluestacks

Now follow the steps below to open and use it.


  • Just go to Bluestacks emulator and click one "+" sign (All Apps) there and click on Showbox app to run it.


Go To All Apps 


Open Showbox App

  • So now you will be available to use the most amazing app for free.
So this was all about how to download and install Showbox movie app on windows 7, 8 and 8.1. If you have any doubt and query feel free to comment below.
Share:

viernes, 26 de diciembre de 2014

Ultimate Pack Of 10 Tips To Improve Your Internet Safety

At present if you want to be secure on the internet then its essential that your computer should be secure. A person can't surf securely on the internet if viruses, spywares and malwares are installed on his or her system. This era is of technology, now a day anything you want in online. If you will say that I want to shop then it's online, if you say I want to transfer funds in a account then it's also online. In this way it becomes our prime duty to be secure. Internet security not only involves browser security but also network security also.
Internet-Safety-Tips
There are many paths which you will have to follow regarding your computer and internet safety. With that in mind I have found a list of internet safety tips & tricks or internet security tips & tricks which are easy to implement but are often ignored by us.

Tips To Improve Internet Safety

Below is a list of verified, trustable and easy to use tips & tricks which you can use to improve security of internet and computer.

10. Enable Your Firewall 
Some of my readers might be unaware about firewall. What is Firewall? This question might be arising if you have read first tip to improve your security. Basically firewall is a system that has rights to control incoming and outgoing network traffic based on the applied rule set (Wikipedia). A firewall establishes a barrier between a trusted, secure internal network and another network (e.g., the internet) that is assumed not to be secure and trusted. 

Firewall is one of the best internet safety tips. If you are using firewall on your system then you are stopping people to enter in your computer from outside your location. A firewall stops software and all those programs accessing internet from your system. All the computers and laptops come with firewall. Firewall is active as default but you should regularly check for it. 

How To Enable Firewall On Your System

1. Search for Windows Firewall on your system, open it.
2. Now look for Turn Windows Firewall on or off.
3. Open this option and then enable your firewall if it's disabled.

Read Also :- How To Share Post Into Multiple Facebook Groups In One Click

9. Use Of Password
Password is a must thing if we are talking about security. If you shop often online then it's essential that your account password should not be this much simple that anyone can hack it easily. It's always advised that you must create separate passwords for every account that you make online. Use of strong password minimizes the risk up to 50-60%. A strong password should be a mix up of alpha numeric capitals and special characters. Such as 98Po245??RT can be an example of strong password. Make your password this much strong that it can't be break easily.

8. Encrypt Files
Encrypting of files increases your safety and you can do this from your own system with few clicks. According to Wikipedia "Encryption is the most effective way to achieve data security. To read an encrypted file, you must have access to a secret key or password that enables you to decrypt it. Unencrypted data is called plain text ; encrypted data is referred to as cipher text". Encryption of files makes it harder for the third parties to read them.

How To Encrypt A File

1. Select the file and right click on it.
2. Now select properties from the menu.
3. On the General tab click on Advanced.
4. Tick the box next to "Encrypt Contents To Secure Data".
5. Click on OK.

7. Use Of Updated Browser
It's very easy for the hackers to compromise your computer if you are using an outdated browser. The reason it that it's not updated to the latest threats, viruses which enables hackers to easily break your security. The main reason of update in a browser is to improve your internet security. There might be some bugs in your browser which hackers can see easily to get into your system. So it's always advised to update your browser as soon as update is made available.

6. Use Of Updated Software
If you will ask about the most overlooked security threats to computers then it's the use of out dated software. Almost all the software's uses internet to know about the latest thing available for the user but if you are not updated to latest version of software then it's the easiest thing for any hacker to compromise your system using "back doors" technique. So update your software as soon as it notifies you about it.

5. Use Of Updated Antivirus
If you are using outdated definitions of antivirus then your system is not protected to new viruses, malwares. Dozens of new viruses, malwares and spywares are found per day and new definitions are made to remove them. If you are not updated to those definitions then you might not be able to fight against new viruses. It is advised to update your antivirus once a week. Some antivirus offers definitions regularly each day which is quiet awesome. 

Read Also :- Get Any MyThemeShop Theme/Plugin For Only $9 

4. Full Scan Once A Week
Some users are in a habit of using updated antivirus but not in a habit of scanning their computer regularly. If you are a regular user of internet then it's always advised to run a full scan using your antivirus program once a week. 

3. Protection Of Internet Connection
It's really amazing how the use of internet has increased so much. This has been made possible only because of technology. But with the new technology the thing of consideration is security of internet connection. If your internet connection is not protected then anyone can use your internet data and also can access your system easily using the hacking tools available. Choose a strong password to secure your internet connection such as wireless broadband.

2. Safe Browsing
Sade browsing is also an essential feature to stay secure. Some people are in a habit of visiting new websites, clicking on advertisement which enables hackers to get into your system. Those sticky ads can be a prank which can harm your system to a large extent. While all the websites online are not secure, some of them are filled with viruses such as Trojans. When you visit these websites viruses becomes active and reaches to your system. So it is advised to stay active while browsing and not to click on anything that looks suspicious.

1. Avoid Downloading
Biggest source of viruses, malwares and spywares is the files which you download from the internet illegally. Almost all those files are filled with threats which are hidden to you. Only an updated version of antivirus can look for them. Always try to avoid illegal downloading and scan every file which you download from a trusted source. Also check about the reputation of the website from which you are downloading the files. You can use either avast browser extension or McAfee web protection to check when a website is free from viruses or not.
Share:

lunes, 22 de diciembre de 2014

Get Any MyThemeShop Premium Theme/Plugin For Only $9

In my previous article I had a review of MyThemeShop's premium theme Yosemite. In that article I was offering a huge discount of 50% which looks quiet good. But as the Christmas is arriving so MyThemeShop has decided to give Christmas gift to the users. Mythemeshop is running holiday sale for limited time period. 

MyThemeShop Holiday Sale
Now you can get any theme or plugin for only $9 within MyThemeShop holiday sale. Yes!! you heard it right. I know it's a really huge discount offered by MyThemeShop but the fact is you can now get any theme or plugin for just $9. 

https://mythemeshop.com/?ref=rahulthepcl
Use Coupon Code HolidayTheme9 (Get Any Theme For Only $9)
Use Coupon Code HolidayPlugin9 (Get Any Plugin For Only $9)

Why Should I Go For MyThemeShop

This question might be arising in your mind that why should i go for mythemeshop. So the answer to this question is simple and I will make you understand by some points given below. After reading these points you will know why Mythemeshop is one of the best premium WordPress theme provider?
  • All themes load with blazing fast speed which means that your site got full marks in the site speed test which is a important feature of SEO.
  • All the themes are fully responsive and mobile-ready that means that now your users can navigate your site on any device with simple to use layout.
Read Also :- How To Share Post Into Multiple Facebook Groups At Once
  • Mythemeshop claims that their all themes are optimized by professional bloggers it means that there are negligible chances of vulnerability in the code. This makes your site secure.
  • All Mythemeshop themes are optimized for Adsense advertisement that means that now you don't need to worry about where to place ads in your theme. This increases your Ad revenue.
  • You can set-up any theme in just one click which enables easy setup.
Now you must be aware why you must go and try Mythemeshop themes and plugin. According to me Mythemeshop is a team of passionate developers who knows one thing very well that there users should get best of premium themes. You can easily notice that all the themes are SEO ready and will rank well for your unique and fresh content after the purchase. You can purchase any theme using below link and use mythemeshop coupon code to grab this huge holiday sale discount.


Click Below To Grab This Offer From MyThemeShop

https://mythemeshop.com/?ref=rahulthepcl
Use Coupon Code HolidayTheme9 (Get Any Theme For Only $9)
Use Coupon Code HolidayPlugin9 (Get Any Plugin For Only $9)

You can check some popular and best selling MyThemeShop themes and plugin list.
So this was all about Christmas offer from MyThemeShop. Grab this deal as soon as possible. Offer is only for limited time period. 
Share:

martes, 16 de diciembre de 2014

Yosemite Premium MyThemeShop WordPress Theme At 50% Discount

MyThemeShop is one of the top and leading WordPress theme and plugin seller available on the internet. They offers various unique, clean and trendy designed premium and free WordPress theme. MyThemeShop has something for everyone. One can get themes related to Blogging, Magazine, News, eCommerce, Shop, Free WordPress Themes and much more. You can easily find Premium Responsive WordPress Theme and no doubt Free Responsive WordPress Themes also. Here in today's guide I am offering a big discount on all premium MyThemeShop themes. You can get MyThemeShop themes at 50% discount through my coupon code (Coupon Code: Crunchy50). So you can easily buy any theme for $17.5 which actually worth is $35.

Yosemite Premium WordPress Theme

Why You Should Consider MyThemeShop

The Reason behind my considering of MyThemeShop is simple. They have the world's top class themes collection. Which loads with blazing fast speed. They have over 179K happy and satisfied customers. You can choose any theme from a collection of 82 themes & plugins. Here I am talking about some points which will tell you why MyThemeShop is the best.
  • They offers fully responsive and mobile-ready themes.
  • All the themes and plugins are optimized by professional bloggers.
  • You can set-up your themes and plugin in just one click.
  • Handcrafted from design to code.
  • Themes works on all devices.
Read Also :- Top 10 Best Free/Paid Vulnerability Scanners
  • These themes will improve your overall ranking.
  • These themes will increase your Ad Revenue.
  • Offers friendly support team.
 Coupon Code: Crunchy50 (Get 50% Discount) 

[Review] Yosemite WordPress Theme By MyThemeShop

Yosemite is a clean and elegant premium WordPress theme by MyThemeShop. This theme is inspired by Apple's Yosemite OSX design. The theme has a newsletter plugin and compatible with MegaMenu, WP Review Pro. It is fully optimized for Adsense, page views and readability.

Features Of Yosemite WordPress Theme

1. Adsense Optimized :
Yosemite WordPress Theme is optimized for Adsense. So you will be able to earn more through your blog or website because of increased CTRs and RPMs.

2. WP Review Pro Compatible :
Yosemite is compatible with WP Review Pro. This way you can easily add reviews and allow users to review your posts. There are many different rating system available which you can use.

3. WP Mega Menu Compatible :
Yosemite is compatible with WP Mega Menu plugin which allows you to create rich menus with images and much more.

4. Fluid Responsiveness :
This theme is fully responsive. It's fluid responsiveness makes it enable to adjust automatically for the best display on different devices.

5. Higher Engagement Rate :
MyThemeShop has compared this theme with the other themes and found that users have more engagement with this just because of clean design and layout.

6. Schema Integrated :
MyThemeShop has integrated this theme with schema, this way search engines will be able to understand what your site is about. Thus your content will stay organized.

7. WP subscribe Plugin :
Yosemite comes with WP subscribe plugin which you can use to generate email list and grow user engagement.

8. Better Readability :
Yosemite offers easy to read fonts and plenty of contrast which will increase readability for the users.

9. SEO :
Yosemite is optimized for SEO so now you will be able to generate decent traffic for search engines easily. This way your site will rank higher compared to others.

10. Parallax Scrolling :
The sleek parallax scrolling effect adds a visual 3D pop for the users when they scrolls.

11. Social Media Buttons :
Yosemite is optimized with all the social media buttons so now you don't need to add any plugin manually.

12. Authorbox :
Yosemite comes with beautiful authorbox which informs users who is the writer of this article.

13. Breadcrumbs :
Included breadcrumbs helps user navigate easily throughout your blog or website.
https://mythemeshop.com/themes/yosemite/?ref=rahulthepcl
Coupon Code: Crunchy50 (Get 50% Discount)

So this was all about Yosemite premium WordPress theme. Which you can grab only in $17.5 instead of $35 using my coupon code Crunchy50. Use this coupon to get 50% discount. Checkout their website for more features of Yosemite.
Share:

lunes, 8 de diciembre de 2014

How To Share Post Into Multiple Facebook Groups In One Click

We all are aware about the popularity of Facebook. It's one of the best method to share your content online or you can say best social media ever build to promote your contents and products online. Facebook provides many features to boost your traffic in seconds such as Facebook Page, FB Groups, Your Own FB Wall etc. If you will ask me which is the best method in these features to viral your product or content then I will go for FB groups. The reason is that it's a child play to join a Facebook group but to spread your post, images on internet via Facebook page you will first need decent likes on your FB page say 100000. Which is a little difficult task.
Share-Post-Into-Multiple-Facebook-Groups-At-Once
Share-Post-Into-Multiple-FB-Groups
If you will debate with me that I can share my content through my own wall so let me remind you, Facebook allows only 5000 friends in a single ID. So everything is crystal clear, only groups are the best way to reach a big crowd of people.

You can join as many groups as you want. But the thing of consideration in this article is that you can't promote your content in groups one by one. It will cost you a lot of time. According to me no one have this much of time at present. So to help you I have found a trick using it you can share your post in multiple FB groups in just one click. You will be able to share your post, images in multiple Facebook groups at a time in a single click only.


What You Will Need?

The first thing that you will need is Groups. Lol, to share your content this is the only thing which you will need right now. Go and join lots of Facebook groups in your niche.

Read Also :- Recover Deleted Whatsapp Messages

Note:- Try to join only those groups which have at least 10000 members because this is the minimum amount which will drive decent traffic to your posts.

How To Share Post Into Multiple Facebook Groups At Once

You might not be aware about this thing that every FB group has an email address same as every profile on Facebook possess email address. The first work is to grab the email address of all the groups that you have joined. 

How To Grab Email Address Of Facebook Groups

There are currently two methods to find email address of Facebook groups.

1. Simply click on the 'About' tab of a group and then you can see the email address of that group on the top right hand corner of the page. However, most of the groups will be missing email address because the admin has removed the email address from being shown.

2. This is the evergreen way to find the email address of a group. You can find it by looking at the URL in the address bar. Each group's URL is distinguished by either a name or a number. 

Now follow the steps below:

Step 1: If you are able to find email address of a group in the about section then it's fine otherwise look at the address bar of your browser. You will see two types of URL there either the 1st one or the second one.
1. https://www.facebook.com/groups/username
2. https://www.facebook.com/groups/287468242758487/

Step 2: Copy the username or the group id like here it is 287468242758487.

Step 3: Now we will create email address of a Facebook group. Just paste username or group id before @groups.facebook.com. After doing it your email address will look something like below.

username@groups.facebook.com
or
287468242758487@groups.facebook.com

Step 4:
Use above steps to create email address for all the groups that you have joined, make a list of those emails by separating with commas.

Step 5: Now we need to compose a email, simple sign in your email address which you have used to create your FB account. (You can use Gmail, Yahoo or any other).

Step 6:
Click on Compose E-mail.

Step 7: After that copy all the groups emails and paste them in the BCC field.

Step 8: After that add the desired material such as texts, images or links which you want share and click on Send button. That's it, you are done.

So this was a simple guide on how to share your content into multiple FB groups at once. You can join my Facebook group if you need traffic on your contents and products. Currently it's having 11000+ members and the list is growing day by day. Below is the link of my FB Group, go join it and grab the traffic.


Share:

viernes, 5 de diciembre de 2014

3 Ways To Create Free WiFi Hotspot In Windows XP/7/8/8.1

Internet access on Laptops, PCs or Mobiles is quiet common these days. According to a rough estimate around 85% of the users wired connections other than wireless because cost is very low. But the cost will increase when one accesses internet through routers and paid softwares. But you don't need to worry, in today's my guide I have found some ways to create Wi-Fi hotspot for free
How-To-Create-Free-WiFi-Hotspot
After reading this guide you will be able to share any type of internet connection (Cable Modem,Wi-Fi, LAN, Cellular,Dial-up etc). You can use any Wi-Fi featured device such as Laptop, Android Phones, iPod, iPhone, Netbook, Wireless printer.

Note:- Before reading ahead I want you to make sure that you are having a laptop or PC with a wireless card in it that is not currently connected if your laptop is connected to the wired network. Your wireless card should be free, and you can use it to allow access to the internet.

How To Create Wi-Fi Hotspot In Windows


Method 1: Using Command Prompt

    • First of all press Window key + R, type cmd and press enter.
    • Enter this command directly in your command prompt netsh wlan show drivers (This command will test whether your PC or Laptop supports Wi-Fi hotspot or not.
    Read Also :- How To Recover Deleted Whatsapp Messages
    • Look at the image below if it shows Yes then you can create a Wi-Fi hotspot from your laptop or PC if it shows No then you can't create a one.

    Command-Line
    • Now enter this command netsh wlan set hostednetwork mode=allow ssid=Enter the ssid name here> key=your password. Change "Enter the ssid name here" with your ssid name and "your password" with any password you want to give it. Press enter and now it will show some notifications such as The hosted network mode has been set to allow, The SSID of the hosted network has been successfully changed, The user key passphrase of the hosted network has been successfully changed.
    • In order to start your newly created network type this command netsh wlan start hostednetwork and press enter.
    • It will show like The hosted network started, now you can close your command prompt.
    • In order to share your internet connection via this hotspot just go to the Network and sharing center and click on Change adapter setting. Now right click on the Connection that you use to connect to internet and select properties. In properties go to Sharing tab and check the box "Allow other network users to connect through this computer's internet connection and select the network connection name that is used by your hotspot.(For this check the Network Connection Window and look for Connection which says Microsoft Hosted Network Virtual Adapter). Simply save it now and your internet connection is shared now.

      Method 2: Using Virtual Router Plus

      • First of all download virtual router plus from here.
      • Install the software on your system.
      • Now open VRP and type the name of desired ssid and your password and click on Start Virtual Router Plus.
      • That's it your hotspot will be ready in seconds to share your internet connection.

      Method 3: Using Connectify

      • First of all download connectify software from here.
      • Install the software on your system and restart your Laptop or PC.
      • After the installation is complete open the software on your system and enter your Hotspot Name and Password then click on Start Hotspot.
      • That's it you are done.
      Note:- This software is paid but if you will ask me should I pay for it or not then I will suggest you to purchase a copy for you because according to me this is the best software available in the market.

      So this was all about how to create free wifi hotspot on windows xp/7/8/8.1. Feel free to comment below if you face any problem.
      Share:

      jueves, 4 de diciembre de 2014

      How to Recover Deleted Whatsapp Messages

      Sometime our Whatsapp messages are deleted accidentally. At that time if one doesn't have technical knowledge then can't recover deleted Whatsapp messages. So today I have found a trick to recover deleted Whatsapp messages or get back deleted Whatsapp messages

      How-to-Recover-Deleted-Whatsapp-Messages
      Recover Deleted Whatsapp Messages
      Whatsapp takes backup of your messages everyday so that user can recover Whatsapp messages. But when a message is deleted accidentally then some users are not in a situation to recover them because of not having any prior technical knowledge. So below is the trick using it you can easily recover your Whatsapp messages.

      Read Also:- How To Increase Download Speed In IDM Upto 20%
       

      Recover Deleted Whatsapp Messages

      • First of all go to your Whatsapp database folder using the path sdcard/Whatsapp/Databases. You can use your default file explorer or any third part explorer for this job.
      • Open the database folder any there you will see your Whatsapp chat files with name such as msgstore-2014-12-04.1.db.crypt. Notice the file it's having date. In that same folder you will find a file naming as msgstore.db.crypt, simply rename this file. Like i have given this file name as mymsgstore.db.crypt
      • After renaming this file search for the file which shows date when you deleted your Whatsapp messages. Say my file is msgstore-2014-12-04.1.db.crypt, just rename this file as msgstore.db.crypt.
      • Now just go to Setting>Applications>manage applications>Whatsapp just click on clear data. Now go to your Whatsapp, fill the required details and click on restore option.
      • That's it, your accidentally deleted messages will be recovered now.
       Note:- So it was a simple and easy to use guide on how to easily recover deleted Whatsapp messages. It is always advised to take a backup of your Whatsapp messages before doing any type of new installation. If you will ask me then i will advice you to take a backup whenever you feel that you can be a big problem of accidentally deletion of Whatsapp messages. Don't wait for the Whatsapp to take backup.
      Share:

      martes, 2 de diciembre de 2014

      Top 10 Best Free/Paid Vulnerability Scanners

      Technology is evolving day by day. Thus with the evolution of technology comes the issue of safety and security. No doubt there can be bugs in the new experiment. It's not always that a software, app or anything which uses coding can be free from errors. We may find vulnerability in it which can be very dangerous for our business. Finding vulnerability can be a difficult task because it requires high skills. But to make your work more easiest and efficient I have found some best vulnerability scanners. These top vulnerability scanner will complete your work in less time but the effectiveness will remain in your work.

      Top-10-Best-Vulnerability-Scanner
      Top-10-Best-Vulnerability-Scanner

      1. Nessus

      Features: Asset discovery, IPv4/IPv6/hybrid network scan, patch auditing, control system auditing, sensitive content auditing, mobile device auditing, automatic scan analysis, Botnet/Malicious Process/Anti-virus Auditing, compliance auditing, configuration auditing, broad asset coverage and profiling.

      Supported Operating Systems: Windows, Mac, Linux, Solaris, BSD, Cisco iOS, IBM iSeries.

      Price: Paid 

      2. Core Impact Pro

      Features: 
      • True multi-vector testing capabilities across network, web, mobile, wireless.
      • Validate patching efforts to ensure vulnerabilities were remediated correctly.
      • Remediation validation.
      • Android agent and post exploitation modules.
      • Domain information gathering tools.
      Supported Operating Systems:  Windows

      Price: Paid

      Read Also :- How To Increase Download Speed In IDM Upto 20%

      3. Nexpose

      Features: 
      • It simplifies your security program workflow.
      • Validate vulnerabilities with Metasploit.
      • Discover vulnerabilities like an attacker.
      • Increase efficiency with fast, unified scanning.
      • Simplify your compliance auditing and reporting.
      • Prioritize threat-driven risks with RealRisk.
      • Perform powerful reporting & data analytics.
      Supported Operating Systems: 
      • Microsoft Windows 7, Windows 8, Server 2008 (R2), Server 2012, Server 2012 (R2).
      • Red Hat Enterprise Linux 5.x, 6.x.
      • Ubuntu Linux 10.04 LTS, 12.04 LTS.
      •  Kali Linux 1.0.x.
      • Virtualized Machines on VMware ESXi 5.x, VMware vCenter Server 4.x, VMware vCenter Server 5.x.
      Price: Paid

      4. OpenVAS

      Features: 
      • It is a framework of several services and tools offering a comprehensive and powerful vulnerability scanning and vulnerability management solution. 
      •  Accompanied with a daily updated feed of Network Vulnerability Tests (NVTs).
      • Components are licensed under the GNU General Public License (GNU GPL). 
      Supported Operating Systems: Windows, Linux and many more.

      Price: Free

      5. QualysGuard

      Features:
      • Immediate deployment.
      • Global scalability. 
      • Automated monitoring.
      • Public or private cloud deployment.
      • Extensible APIs.
      • Asset discovery.
      • Continuously Identify & Address Proliferating Security Threats. 
      • Find, Shield & Fix Vulnerabilities in Your Web Apps.
      • Harden your systems and applications.
      Supported Operating Systems: Windows

      Price: Paid

      6. MBSA

      Features: 
      • The Microsoft Baseline Security Analyzer provides a streamlined method to identify missing security updates and common security misconfiguration.
      • Recent version of MBSA (2.3) adds support for Windows 8.1, Windows 8, Windows Server 2012 R2, and Windows Server 2012. 
      Supported Operating Systems: Windows

      Price: Free

      7. GFI Lan Guard 

      Features: 
      • Patch management for operating systems
      • Patch management for third party applications.
      • Vulnerability assessment.
      • Track latest vulnerabilities.
      • Integration with security applications.
      • Network device vulnerability check.
      • Network and software auditing.
      • Comply with PCI DSS an other regulations.
      • Support for virtual environment.
      • Powerful interactive dashboard.
      Supported Operating Systems: Windows

      Price: Paid

      8. Secunia PSI

      Features: 
      • The Secunia PSI is an invaluable tool to use when assessing the security patch state of software installed on your system. It monitors system for insecure software installations. It will notify you when an insecure application is installed. It provides you with detailed instructions for updating the application when available.
      Supported Operating Systems: Windows

      Price: Free

      9. Retina

      Features: 
      • Non-intrusive scanning engine.
      • Most comprehensive vulnerability database.
      • Flexible and scalable. 
      • Integrate with leading penetration testing tools.
      Supported Operating Systems: Windows

      Price: Paid

      10. Nipper 

      Features: 
      • Detailed security auditing highlighting configuration vulnerabilities.
      •  Summarize security of network devices such as firewall, switches and routers.
      • Detailed configuration auditing.
      • Improved vulnerability assessment.
      • Customizable auditing.
      Supported Operating Systems: Windows, Apple Mac OSX, Linux

      Price: Paid
      Share:

      lunes, 1 de diciembre de 2014

      Free PSD To Html Converter

      We all know very well that a graphics designer is a very poor coding. Almost everyone hates the coding. So they are dependent on the tools and online method that can easily convert PSD files to HTML. In today's tutorial I have found some tools through which you or any graphic designer can easily convert PSD files to HTML/CSS. This way it becomes very comfortable because you can design anything as you want and after that use free or paid PSD to HTML conversion tools.

      Free-PSD-To-HTML-Converter
      Free-PSD-To-HTML-Converter

      Free PSD To HTML Conversion Tools 

      Below I have listed some top tools to convert PSD files in HTML format. There are many online tools available to do this job but most of them are premium services. But I have found some free methods to who can't afford premium services.

      1. PSD To WEB

      PSD To WEB is a free PSD to HTML converter. It will convert your Photoshop PSD files to HTML retaining original layers including positions as html div layer. Simply upload your .psd file, check HTML and PNGs and just download your files in seconds.

       Read Also :- How To Access Free Internet With NMD VPN Software On PC

      2. PSDToHTML Converter

      This is another awesome tool that easily convert your PSD files in HTML. This tool is not free but you can get it for free. Here's a simple trick using it you will be able to use it for free. The trick is that just post their affiliate link on your blog/website/social page and send them a email support@psd2htmlconverter.com. Once your affiliate link is verified by them you can easily get a free copy of PSD to html/CSS converter.

      3. Jaddi

      It's One of the best and trusted free psd to html converter tool available online. Jaddi will convert all your PSD layers into HTML, text layers into web-safe font. This tool will easily optimize your images and position them in correct locations. Just browse for the Photoshop .psd file and your file will be converted in seconds!

      4. CSS3Ps

      It's a cloud based service which will convert your PSD file into CSS. It offers several types of services which can help you a lot in the conversion. Overall it's one of the trusted cloud service available online.

      These are the best free tools available online to convert your .psd file into html/CSS easily. If you are not in a stage of using paid services then take the full advantages of these free services.
      Share:

      sábado, 29 de noviembre de 2014

      How To Increase Download Speed In IDM Upto 20%

      You all are aware about IDM (Internet Download Manager). I might not be wrong if I say that it's the only software available to boost your downloading speed. IDM can increase your downloads up to 5 times. But did you ever think of increasing downloading speed of IDM? I think the answer is a big No. Just chill at the end of this article you can not even think of that but also you will be able to boost download speed in IDM. There is a tool called IDM Optimizer which can help you a lot in boosting download speed in idm. First of all let's talk about what is idm optimizer?

      IDM-Optimizer
      IDM-Optimizer

      What Is IDM Optimizer?

      The purpose of this light weight software is to optimize the download speed and thus get the files with less time on your computer. IDM optimizer features a simple and clean interface which has only three buttons. The first one if for accessing the proxy settings, second one to optimize the download speed and the third one to restore default settings in the idm optimizer.

      Read Also :- 5+1 Best ClickBank Alternatives

      How IDM Optimizer Works?

      IDM optimizer tweaks the settings of IDM by modifying the default connection type to 'other' and thus increase the connection and download speed. In this all process total number of connection is not modified. 

      If you are not happy with the new applied setting then you can easily revert back changes and can go back to previous setting by using default button.


      How To Download and Use IDM Optimizer?

      • First of all download and install IDM optimizer on your system from Here.
      • Run the application and then click on Optimize Now.
      • It can take some time to optimize connection after that it will ask you to restart your idm, simply do it.
      • Now you will be able to see a increment of up to 20% in your download speed.

                          Download IDM Optimizer

      This was all about how to boost download speed in idm. Personally i have seen a increment of about 15-20% in my download speed after using IDM optimizer. You can give it a try.
      Share:

      viernes, 28 de noviembre de 2014

      How To Access Free Internet With NMD VPN Software On PC

      Today in this article I am going to demonstrate a tutorial about a very useful software NMD VPN. I know most of the users are surely unaware about it. You all search for free internet tricks sometimes. We always think that we will get any trick to use free internet on mobile. Google for free internet on PC and there will be lakhs of result. Most of the results are fake. They are on Google to just earn money by making people fool. 
      Access-Free-Internet-With-NMD-VPN
      Access-Free-Internet-With-NMD-VPN
      If it comes to use free internet on PC then no one can beat NMD VPN. You can easily get internet for free to access websites without any restrictions. First of all let's talk about what is NMD VPN?

      What Is NMD VPN?

      According to shariqueweb NMD VPN is an Open VPN client that is mostly used to access free Internet on PC & it is very popular among Indians. Overall it is a most widely use method to gain free internet. 


      Features Of NMD VPN Software

      • It is available freely anyone can download it and use for free internet tricks.
      • It supports all TCP and UDP ports.
      • Also it supports all HTTP and HTTPS sites.
      • Best software available to use free internet.
      Read Also :- How To Access Whatsapp Without Any Phone Number?

      How To Configure NMD VPN For Free Internet 

      • First of all download NMD VPN software from Here.
      • Extract it using any zip extractor such as WinRar.
      • Now install the software directly if you are on Windows XP.
      • Windows 7 and Windows 8 users right click on the software and click on "Run As Administrator" .
      • Install the software by accepting terms & conditions.

      How To Use NMD VPN For Free Internet On PC

      • First connect your modem or data card or mobile with the internet setting of your internet service provider (APN of Network).
      • Run NMD VPN software on your system.
      • Now search for NMD VPN icon in your task-bar right menu.
      • Right click on it then select VPN Server, connect it by left click.
      Before applying the above four steps you will need to put config files in the folder only then you will be able to connect through the internet.

      Path Of Config Folder For Windows XP/7/8 (32bit) :-  
      C:/Program Files (x86)/NMDVPNconfig

      Path Of Config Folder For Windows XP/7/8 (64bit) :-
      C:/Program Files/NMDVPNconfig

      Note :- We don't provide any config file till yet, you will have to manually find it on the internet.

      If everything will go fine and your config files are right then you will be able to surf internet for free.

      Red Sign Shows NMD VPN is disconnected.
      Yellow Sign Shows NMD VPN is trying to connect.
      Green Sign Shows NMD VPN is now connected. 

      Click Here To Download NMD VPN Software For Free

      Share:

      Popular Posts

      Con la tecnología de Blogger.