Mostrando entradas con la etiqueta How To. Mostrar todas las entradas

martes, 4 de agosto de 2015

[Solved] Skype Login, Sign In Problems In Windows, MAC

We all are aware about one of the top ranking text chat, voice and video call providing service Skype. From a small conversation between family members to a conference between multinational companies everything is on Skype. This is all because of the call quality Skype is providing to their users. But as we know that developers keep on updating these apps for minor or huge bug. It happens some time that people face log in issue in skype due to the latest updates. Many users have reported that they faced problems while trying to sign in into Skype.
Skype Sign In Problems
So to help you through out all the versions we've covered some tips & tricks here which can be easily implemented in order to solve skype sign in problem. We've found two best working methods which is surely going to fix your Skype login error. Check out them below.

1. Through Registry Editor

This is considered as one of the best solution and there are 99% chances that your bug will be easily fixed.
  • First of all you'll need to close skype in order to receive best result.
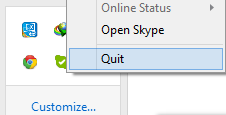
  • Right click on Skype's icon from the right hand side bottom notification area and press quit.
Quit Skype
How To Quit Skype
  • Now navigate to Start, type Run and hit enter or simply press Window Key+R.
  • Type "regedit"in the search box and press enter.
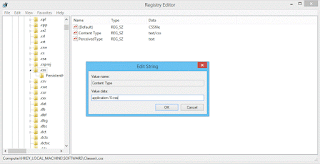
  • After that simply navigate to this path HKEY_LOCAL_MACHINE/SOFTWARE/Classes/.css.
Registry Editor CSS Folder
.CSS Folder
  • Select .css folder and then from right hand side window double click on "Content Type".
  • Check the "Value data", it has default value as "application/X-css". Change it to text/css and hit OK button.
  • That's it, you're done.

2. Through Shared.xml File

If the above method doesn't work for you then try this one.

For Windows: -
  • Close Skype from notification tray as stated above.
  • Ensure that you have enabled "Show hidden files and folders".
  • Now search for Run or launch it directly by pressing Window key+R.
  • Type "%appdata%" and press enter. Now search for Skype folder and open it.
  • Search for "shared.xml" file and delete it. (It will be recreated)
  • That's it, restart the app and your bug is fixed.
For Mac: -
  • Quit the Skype as it's the first step to get the best result of all the solutions.
  • Navigate to ~/Library/Application Support/Skype/ . (Here ~ sign is your home directory)
  • Do the same, delete the shared.xml file and restart your app.
So this was all about how to fix Skype login screen problems. These were the best and proven solutions to this error. If you've any doubt or query then feel free to leave a comment below in the comment section.
Share:

sábado, 1 de agosto de 2015

5 Online Fake Receipt Maker/Generator Tools

Have you lost your gas receipt, tax receipt, taxi receipt, restaurant bill or any other receipt? If yes, then don't worry. We'll make one exactly same looking receipt for you. Don't believe? but it's the truth my friend. There are a couple of tools available online which claims to generate fake receipt of any kind. You can easily make any type of receipt with these websites. The process is also simple, simply fill out all the required details and boom! your receipt is ready. You might have noticed that I have mentioned online tools here so you don't need to download or install anything on your computer first to generate receipt.
Free Online Receipt Generator Tools
Receipt Generator Tools
One more benefit of all these online receipt maker tools is that you don't need to register yourself there. No need to sign up for an account to make a receipt. These websites are having black receipt template along with a form which is going to be filled by you. This form includes both the buyer and the owner's details. So it comes up with an option to make a real looking  receipts. 

Below is a brief description of these tools with their ability as each tool can make only one or two types of receipt. But be calm because we've listed all those tools which are required to make any type of receipt.

1. Custom Receipt Maker

Custom Receipt Maker lets you make your own custom receipt in case you lost one. Navigate to the website and you'll notice that you're provided a receipt template along with a from including some text field. First three text fields are for "Top Lines". This lets you add text on the top of your receipt. Those texts can be anything say store's name, clinic' name and many more. While second and third line can include their address or any tag line corresponding to the store or clinic name. 

Further you can add Items along with their price. You can add up to four items in your receipt with their price value. If you wanna create a receipt of purchased goods then this is the best receipt maker for you. At last you can add any bottom line if you want. Most of the times bottom line is an instruction given to the customer. When you've fill out all the details then just click on "Make the receipt! ", that's it. It will show a receipt of all the details you entered along with grand total of price.

Note: - This tool calculates total of only dollars, so if you're going to enter any other currency then simply select "don't show a total" from the drop down menu.

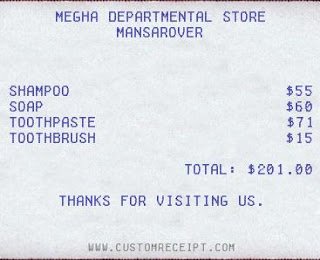
Here I have generated a custom receipt of mine from this tool. You can check it on below image.
Custom Fake Receipt
Fake Custom Receipt
As you can see that I have made a fake receipt that looks like to the original one.

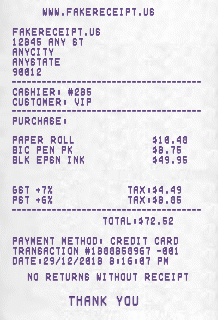
2. Fakereceipt.us - Sales Receipt Maker

One more easiest and free way to create sales custom and fake receipts. You can say fakereceipt an advanced version of custom receipt as it opens the door to add more information into your receipt. There are three main steps included in the receipt generation process. The first step is "Seller information" which include several information such as Seller slogan, store name, address, city, state, postal code, cashier (name or number), customer (name or number), payment method and return policy. 

You can notice that every information filed is provided to make your receipt looks original. 

On proceeding you can see second step as "Purchases" which includes items (along with their price value), tax rate %. You will get an automated calculated grand total of the prices you entered.

Last step is "Make receipt", in this step you can choose currency symbol (USD $, EUR , GBP £), currency symbol position(left or right). Fakereceipt also have an option now to create different style receipts such as Aged Old Style Thermal, Clean Old Style Thermal and many more.

You can see a demo of one fake receipt generated by fakereceipt.us below.
Fakereceipt.us Sale Receipt Maker
Fake Sale Receipt

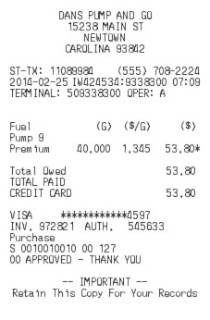
3. Make Receipts | Online Gas Receipt Generator

Another great tool using it you can create online gas receipts. It's an online tool to make free gas receipts for US and Canada. It's one of the best tool to create Canadian receipts. If you had paid for the fuel and forgot to get a receipt then this tool is for you. It's a little bit different tool from others. It calculates the price first before going to receipt information. 

Basically it also consists of three main steps (Calculate fuel totals first, Gas station details, Fuel purchase details) . Complete all the steps and your receipt is ready. 

You've two options in first step, you can either calculate total price from fuel quantity or calculate fuel quantity from total price.

Secondly you can proceed to enter gas station details such as Country (Canada, USA), Complete address (street name, street address, city, state, postal code, area code), tax % where you purchased.

At last just enter fuel purchase detail (measure, product type, quantity, price per G/L, cash paid, credit card paid, credit card name, credit card last 4 digits). When all the information is updated in the required text field simply click on Create/Update Receipt button. You can see a demo of one such receipt in the image below.
Online gas receipt generator
Gas Receipt

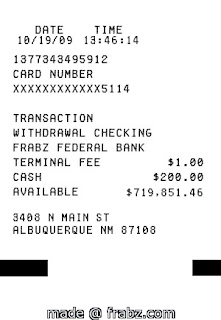
4. Fake ATM Receipt Generator

This was one of the essential which must exist in this list. If you've lost your ATM sleep accidentally or wanna prank your friends with millions of money existing in your account then this website is for you. The thing I loved about this tool is its accuracy. The ATM receipt generated looks like we've just got it from the ATM machine itself. 

One more lovely feature of this fake ATM receipt maker is that it doesn't ask you to enter much information simply enter some common information such as date, time, balance, address, city and state. One previously made script is shown below.
Fake ATM Receipt Generator
Fake ATM Receipt

5. LostHotelReceipt - Hotel Receipt Generator

Last but not the least losthotelreceipt is a tool to create hotel receipts. If you're a hotel owner and wanna provide your customers a receipt as invoice then you're at a prefect place. It won't be ever this much easier to create hotel receipts. The tool has all the required options which must be present in a hotel receipt.

Just enter all the information and serve it to your customers. 

So friends this was all about how to make receipts online in case you've lost your. We've added all type of receipts making tools in the guide. If you think we've not mentioned any tool then comment below and we would love to share it with our readers. If you've any doubt regarding this article then feel free to leave a comment below in the comment section.

Image Credit: - Flickr
Share:

sábado, 25 de julio de 2015

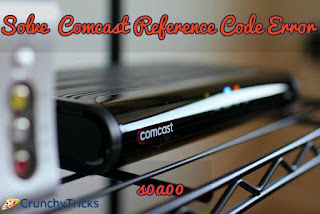
[Fixed] Solve Comcast Reference Code s0a00 Error

Comcast Corporation is the largest home Internet service provider and cable company in the United States by its revenue. Apart from this they also provides telephone services to the US-based users. It is the nation's third largest home telephone service provider. They offer a blazing Internet speed up to 105 Mbps. Formerly Comcast Corporation was registered as Comcast Holdings. According to the sources Comcast is now having more number of Internet users than cable users.
solve comcast reference code error s0a00
It's easy to set up Comcast to use Internet, telephone or cable services. You don't need any type of technical skills even an ordinary person completely unaware of technology can set up it very easily. But as obviously these are made by us humans so sometime they can come across some errors. People face a couple of errors while they try to set up their Comcast. One of them is s0a00 Error

This Reference Code s0a00 Error is faced by a large amount of users all over the world. You might see this error while setting up Comcast:


ONE MOMENT PLEASE


This channel should be available shortly


Ref code: S0a00"
There can be several reasons of this issue, some of them I have listed below. 

Why I Am Facing Ref Code s0a00 Error Code ? (Solution Given Along With Reason)

These are some of the most common reasons which make this error to occur and their solutions are also given with them.
  • Due To Cable Box: - It's one of the most common reason this error occurs. As the time spend due to dust or some reason cable box becomes out-of-order. That's why you are seeing this error. On resetting your cable box your error will be fixed. To reset your cable box simply unplug your adapter and then plug it back after 5 minutes and restart the cable box. Hope your error is gone now.
  • Due To Cable Or Connections: - If on resetting cable box your error is not fixed then this would be the second reason. Sometime due to random reason connections of you cable box becomes loosely bound and then you don't receive proper signals. Power off your set-top box, remove the coaxial cable and then fit it again properly. Remember connection should be proper and tightly bounded otherwise you'll receive poor signal. 
  • Still Not Fixed ? : - Still if you're facing this issue then report the customer care in your area. There should be any internal error which you're not able to see. Be calm customer care services would surely fix your issue.
So this was all about how to fix comcast reference code s0a00 error. Hope your error is resolved after reading this guide if not then contact the customer care or if you're having any doubt or query then feel free to leave a comment below in the comment section.
Share:

Remove Vocals From Song/MP3 Using Audacity

Almost all of use are bathroom singers. Lol :D, but that's the truth of our life. We all like to sing while bathing. It's comes under one of the most common thing of the world. Song people like to sing with the voice of the song while some of them with the beat. But you'll be able to sing on a karaoke track (The music is typically a well-known popular song minus the lead vocal. Lyrics are usually displayed on a video screen, along with a moving symbol, changing color, or music video images, to guide the singer) or a instrumental ring-tone only when vocals won't be present there in the song.
remove vocals from song using audacity
So today in this guide I am going to elaborate how you can remove vocals from a song/mp3 completely using open source software audacity. 

Note: - You won't be able to get rid from vocals of all songs. You can't remove vocals from each and every mp3 using this software rather if you need a quick vocal removal then it's for you. This open source tool will give best result with the stereo tracks.

What Is Audacity?

Audacity is an open source free-ware multi-track audio editor and recorder for Windows, Mac and Linux operating system. 

Features Of Audacity

It has literally awesome features, some of them I have listed below. 
  • Record live audio.
  • Record computer playback on any Windows Vista or later machine.
  • Convert tapes and records into digital recordings or CDs.
  • Edit WAV, AIFF, FLAC, MP2, MP3 or Ogg Vorbis sound files.
  • AC3, M4A/M4R (AAC), WMA and other formats supported using optional libraries.
  • Cut, copy, splice or mix sounds together.
  • Numerous effects including change speed or pitch and vocal reduction or isolation (given suitable stereo tracks).

How To Remove Vocals Using Audacity

  • Download latest version of Audacity from here if you're not having till yet.
  • Install it on your system and click on it open.
  • Now navigate to File>Open and select the desired mp3 file from which you wanna remove vocals. (You can directly drag mp3 from iTunes also)
  • It will load on its own in the audacity.
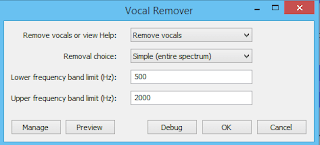
  • After that navigate to Effect> Vocal Remover (for center-panned vocals) and click on it.

audacity vocal remover

  • A new window will pop up simply click on OK button with the default settings.
  • That's it, you'll get a song with removed vocals.
  • To save your file navigate to File>Export Audio.
  • If you're facing error with Simple (entire spectrum) then simply select Remove frequency band or Retain frequency band from "Removal choice". Also you can change frequency band limit.

change removal choice audacity


So this was all about how to remove vocals from a mp3 using free-ware audacity. This was the simplest method to remove vocals. Although you can't remove voice from all the songs only so try your luck. You can get best result for stereo songs. If you've any doubt or query then feel free to leave a comment below in the comment section.
Share:

domingo, 19 de julio de 2015

Google Chrome Standalone Offline Installer [Latest Version]

Google Chrome is a super-fast free web browser developed by the tech giant Google. You can use this browser on each and every device that is computer, phone and tablet. It provides you the ability to search and navigate from the same box. It makes your searching better by suggesting you about the typed keyword. Also it has the facility of auto-filling which saves you time of typing again and again. Type a single character and complete the search bar with just one click to browse the website.
google chrome standalone offline installer

According to the reports of June 2015, 50% people are using Google Chrome of total browser usage. As in India you can't get high speed Internet so most of the users face difficulty while trying to install Google Chrome. You might have noticed that you don't get any .exe file when you try to install Chrome browser rather it's installed directly on your system through the Internet connection. 

So to help the users here I am providing the direct links to download Google Chrome .exe file. This is a Google Chrome full standalone version similar to an .exe (executable file) file. 

How To Download Google Chrome Full Standalone Offline Installer

Follow the step by step process in order to get full offline installer of Google Chrome.
  • If you're installing Chrome for a single account that is your own user account then use this link:

  • If you're installing Chrome for all user accounts on your computer then use this link:
  • Use and open the link according to your need. 
  • Click on "Download Chrome" button.
download-chrome
  • A window will pop up simply click on "Accept and Install" button.
  • Your downloading will begin automatically if it doesn't start on its own then scroll the page and click on "click here to retry".
  • That's it, you've got the latest version of Google Chrome offline installer.
So this was all about Google Chrome offline installer. All above links will update whenever there will be a latest update of Google Chrome browser. So don't worry simply download browser from the link; it will be the latest version. If you've any doubt or query then feel free to leave a comment below in the comment section.

Share:

viernes, 12 de junio de 2015

How To Know Alexa Rank Of A Particular Country

Alexa is an Amazon product. It's a amazon web company which allows you to check your website's global ranking and country specific ranking. Alexa shows the ranking of each and every website which comes under 20,000,000. It shows your website's ranking after measuring a lots of factors such as page views, traffic, keywords ranking and much more. You might have observed that Alexa doesn't start showing ranking until your site has gained enough web traffic. 
check-alexa-rank-specific-particular-country

Alexa is the only website which tell that where your website stands globally. At the initial stage it only updates your global ranking but once you started gaining enough traffic from other countries then it will update your rank for each and every country. In one of my previous article I covered some seo factors which can affect your global ranking.

If you want to know your website's rank then simply do a search on Alexa and then it will show your all over world ranking and ranking in a specific country for example say your website is from India then it will show global ranking along with rank in India. If your website fall under 100,000 then Alexa will show ranking of other countries too. It can update a maximum of 30 countries ranking. But what if you want to know your site's Alexa ranking for other than these 30 countries? My friend you can't get it on any other website or by directly searching on Alexa search.

Relax and site back, Here's a trick to find out Alexa ranking for particular each and every country. Follow the steps mentioned below in order to find Alexa rank for specific country.

How To Check Alexa Rank For Particular Country

1. Sign Up For A Account
First of all you sign up for a new account on Alexa. Click on "Sign Up" button on the top right corner. Choose any paid service or go for a free account. You can get 7 days free trial from Alexa. Choose free trial service if you don't wanna pay at starting.

2. Ownership Verification
This is the second step which is must to appear your Alexa ranking for the first time. Just upload the HTML file to your website's root directory and add Alexa meta tag to the header of your site. Once your ownership is verified you are free to add description of you website and all other details. Alexa lets you put 2 links also just below your description but for this you need to choose a upgrade plan.

3. Check Country Specific Rank
Once you have saved your profile, you have completed 75% of the work. Your ranking stats would appear in 2-3 days. At initial stage you can see only global ranking of your website. To see particular country Alexa rank follow the below mentioned steps:-
  • Login into your Alexa account.
  • Click on My Dashboard.
  • Choose your website and navigate to Site Management>>edit Site Listing.
  • Scroll to the end of the page now here you will see Alexa Traffic Rank In Country.
  • Here is a list of over 200 countries to choose from drop down menu. Go and check out your website ranking for some countries and start increasing your Alexa ranking.
So this was all about how to check your website rank for particular country. To get benefit of this feature you need to sign up on Alexa as according to terms & conditions this ranking checking factor is not available publicly. If you have any doubt or query then feel free to leave a comment below in the comment section.
Share:

sábado, 4 de abril de 2015

How To Type Copyright, Trademark, Registered Symbols In Photoshop

In today's guide I am going to show you the ways to insert copyright, trademark and registered symbols in Photoshop. I have collected all the possible methods to type copyright, trademark and registered symbols. If you are facing any problem regarding this issue then you just go through the guide below. There are basically two methods to make copyright and other useful symbols in Photoshop.

1. From Custom Shape Picker
2. From Keyboard

I am going to discuss both the methods deeply in order to do the copyright, registered and trademark symbol. 
How-To-Add-Copyright-Trademark-Registered-Symbol-In-Photoshop

1. Create Symbols With Custom Shape Picker In Photoshop

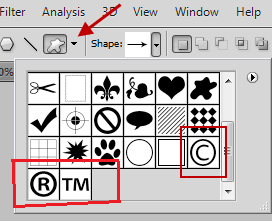
This is the first way to insert copyright symbol in Photoshop.You might don't know but Photoshop comes preloaded with all the special symbols and characters such as copyright symbol (©) , trademark symbol (™) , registered symbol (®) and many more. You just need to select them to insert in your document. Just follow the steps given below to add copyright symbol and others also.
  • First of all go to Custom Shape Tool.
  • Now just click on Shape Thumbnail from the Options Bar.
  • Now you can see all the special symbols and characters, choose the copyright symbol (©) in order to insert it in your document. Do the same for all. 
Open-Custom-Shape-Tool

Open-Custom-Shape-Picker

2. Create Symbols In Photoshop With Keyboard

If you don't find the above mentioned method convenient and are in a habit of using keyboard a lot then here's another method for you. You can use the pre-made code to insert special symbols in Photoshop. I have listed keystrokes values for copyright, trademark and registered symbols below. If you want values for more symbols then use Character Map application in Windows. The Character Map can be found by going to the Start Menu, then All Programs/Accessories/System Tools/Character Map

Keystroke For Copyright Symbol :- Alt+0169

Keystroke For Trademark Symbol :- Alt+0153

Keystroke For Registered Symbol :- Alt+0174

So this was all about how to insert special symbols in Photoshop. If you have any doubt or query then feel free to leave a comment below in the comment section.
Share:

domingo, 22 de marzo de 2015

Best Tips For Boosting App Marketplace Ranking


The search engine optimization plays a critical role in the accomplishment of many big businesses for a greater time. Not only the highest ranking at the Google search results matters most, but ranking better in the mobile app stands important. Actually many of the consumers are using mobile applications with the rise of more Smartphones in the market. Mobile apps are vigorously used for playing games, online shopping, movie reviews, online movie booking, connecting with friends, and many more.
Best-Tips-For-Boosting-App-Marketplace-Ranking

Your app success depends mainly on how finely it ranks. This is actually a tricky task to make the mobile app rank excellently. As many users have web browser set up on their smartphones, you can certainly offer your app a good push so that the ranking will go up. We’ve listed here few of the best search engine optimization (SEO) tips that can increase the App marketplace ranking.

Understand The App Store Optimization

You should firstly understand the App Store Optimization (ASO) for developing the ranking of your app. This will assist your app in staying prominent. The target of ASO is to compel huge traffic towards your apps page for driving more number of downloads. For executing this, you can decide on the keywords that are to be used in your campaigning. Besides keyword performance, pay-per-click (PPC), word of mouth and reviewing server logs are the vital factors. 

Valuable Tool For Expanding Your Brand

Being an app developer or a business owner, you should concentrate on your mobile applications in order to expand your brand in a wider way. If you are having your own website or running your company’s site, with a mobile application you can further grab a fresh audience that was inaccessible earlier in the past. The consumers and clients of today are anticipating that whatever they require can be available on their mobile devices easily. 

Read Also :-
10 Methods To Increase Alexa Ranking Of Your Blog 
8 Most Common SEO Mistakes And Ways To Fix Them 
Ultimate Pack Of 10 Tips To Make Your Blog Popular In 30 Days


Know The Audience

It is very important to know your current audiences for them to use your app frequently. This is extremely critical for you to know which category of people are using your app, and how much attractive your apps are to them. You can refer to the other developers that have crafted apps just like yours, search them on social media, and also view their followers where they’re interested. You can even work out where your main audiences are situated for appealing them most. 

Target Market

You require taking the advantage of your sources of traffic though it’s quite tough to implement. It is very necessary to promote your apps often on regular basis. You need to talk about your app on social networking sites, send press releases, and advertisements on websites, write interesting blog posts, and carry out interviews regarding your apps. You need to market your app regularly for increasing the traffic. People will not only love your brand app but also support them, thus adding better traffic. 

Select The Best Category

As the competition is severe in the market, you need to strive hard to get top ranks for your apps in the App Store. So you can work elegantly by selecting a small category regarding your app. Instead of ranking average in the bigger categories, it is superior to rank at the top in a smaller category.

Improve Your Rating

When you apps have been popularly used, you can ask your regular users to rate your apps anytime whether they had a very good or good or average or bad experience by ticking in the rating boxes. When they say they have good or average experience, they leave back an official review, but if they’ve a bad experience, a contact form is offered to them. 

The Metrics Of ASO

You should consider few of the essential elements of ASO strategy that covers title, keywords, and downloads. You should include the most suitable keywords in the title that has the maximum performance. When you’re selecting proper keywords for your app, you should concentrate on selecting the ones that are quite niching enough. While downloads, the total number as well as momentum are the solution for having a thriving listing. 

Long Term Thinking

When you’re set to rank your app elevated on the app marketplace, you should go for long term thinking, by perking up your success level through delivering best quality products to your users. With the use of better qualities, the main app marketplace decides the ranking position to let you know whether the app is functional. 

Professional Icons And Screenshots

You should always remember to insert professional icons and screenshots for you app for maximizing more number of people who will download your app quickly. You should hire a professional to craft such an icon so that it looks appealing. Never allow your app icon to be poor that will only reduce the people from visiting your app as they won’t even download your app. You should also make sure that the screenshot of your app will appear exceptional. 

Listen To The Feedback

At last you should always listen to your users’ feedbacks. The users should approach your app and give their feedbacks that will help you in developing your app. You can even reflect upon adding a pop-up exhibit often by asking your users to give feedbacks. But you should ensure that this pop-up shouldn’t come up in between when your user is using your app. 

Therefore, you should always keep these effective tips in mind, in order to boost your app ranking that can gather more number of viewers towards your sites. 

About The Author :-
Krsity loves to hang out with her friends in her free time and to work with Essay On Time as a proof-reader to deliver quality content.
Share:

martes, 10 de marzo de 2015

{Genuine} AVG 2015 Removal/Uninstaller Tool For Free

As we know that AVG is one of the most trustable antivirus available on the internet. It is used to remove any type of virus, spyware or malware. But I have seen that some users are not able to uninstall or remove AVG antivirus from control panel on their system while some time it causes error while uninstalling AVG antivirus. So in this guide you will uninstall AVG antivirus Free 2015 with the use of AVG Antivirus Removal Tool 2015. AVG Removal Tool is officially launched by the AVG technologies for the users who are not able to uninstall AVG antivirus properly. 
Genuine-AVG-2015-Removal-Uninstaller-Tool-Free

How To Uninstall/Remove AVG Antivirus By Traditional Way

If you are not able to uninstall AVG antivirus through traditional way that is using Control Panel then follow the step by step guide.
  • Press Window Key+R or open Run and type "Control Panel" in the text field, hit enter.
  • This will open Control panel on your system.
  • Just navigate to this path now Control Panel >> Programs >> Programs and Features.
  • It will show a complete list of installed softwares on your system, search for AVG 2015.
  • Select AVG 2015 and then click on Uninstall/Change button. Now a dialog box will open which will give you some options such as Update AVG, Uninstall AVG
  • Click on Uninstall AVG, Next, select "Remove user settings" (don’t do this if you’re planning for a reinstall) and "Remove Virus Vault contents" and click ‘Next’ button.
  • Now just restart your system to make the changes appear.
Now if the un-installation process fails or shows an error then it's time to remove it with the official AVG removal tool 2015.

How To Remove/Uninstall AVG Antivirus With AVG Removal Tool

This tool is officially available on the AVG's website so that people don't face any inconvenience regarding un-installation of AVG antivirus 2015. AVG uninstallation tool will remove following AVG products:
  • AVG Antivirus Free 2015
  • AVG Antivirus 2015
  • AVG Internet Security 2015
First of all you will need to download AVG Removal Tool. Download It from below link :

AVG Remover 2015 (32 bit) :- Click Here
AVG Remover 2015 (64 bit) :- Click Here

Now just install this tool on your system and follow the step by step process to remove AVG 2015 antivirus from your system. Both are verified & official tools from AVG technologies so you don't need to think about any type of virus or malware problem. It will remove AVG user settings, virus vault contents, and other files related to AVG installation. If you have any doubt or query then feel free to leave a comment in the comment section below.

Share:

viernes, 6 de marzo de 2015

Download Time Stopper Software - Stop Trial Period Of Softwares

Time Stopper is a tiny utility which eliminate the time limit existing into trial software usage period. Time Stopper Software works with any software executable file and practically will extend the trial period of the program for an unlimited amount of time.

Download-Time-Stopper-Software-Stop-Trial-Period-Of-Softwares
Time Stopper is very easy to install and use: you just have to browse for the executable file of trial program (generally located in C:Program Files) and select the new installation date. Now, your program trial period will be automatically extended to another 30 / 90 days, depending on the software.

Time Stopper will not modify the time and date of the operating system, therefore is safe to use. Using Time stopper you can use trial version software without expiring. If you don't have enough trial period of any trial version software you can extend the trial period using Time Stopper (Source : Time Stopper).


Note :- This software is only for educational purposes and please do support the software authors to purchasing the software which you really want. Time Stopper is not for all trial versions of the world. According to the brother soft and cnet Time Stopper had been listed under best 50 utility software of the world.

System Requirements For Time Stopper

In order to use Time Stopper, you must have one of the following operating systems installed on your computer:
  • 64 MB Of RAM
  • 1 MB Of Free Disk Space
  • Microsoft Windows NT/2000/XP/2003/Vista/7

How To Download And Use Time Stopper Software


  • First of all download Time Stopper software from below links according to the browser your are using. 

Mozilla Firefox :  Click Here To Download
Google Chrome :  Click Here To Download
Internet Explorer : Click Here To Download
Opera                   : Click Here To Download
Safari                   : Click Here To Download 
  • Now extract the Time_Stopper_Setup.rar on your system.
  • If you don't have any .rar file extractor then download it from here.
  • Install now and open it to use on your computer or system.
  • Browser for the .exe file of the software, you can find it in your C drive easily.
  • Now just choose a date say your trial period is expiring today then just choose a date of after two days and create a shortcut on the desktop.
  • That's it, whenever you want to use your program just launch your shortcut.

So it was all about time stopper software which is used to stop trial period of softwares. Use this software only for educational purposes. If you have any query of doubt then feel free to leave a comment below in the comment section.
 
Share:

lunes, 2 de marzo de 2015

[Solved] Fix Building Font Cache Error In VLC Media Player

VLC is a free and open source cross-platform multimedia player and framework that plays most multimedia files as well as DVDs, Audio CDs, VCDs, and various streaming protocols. It's one of the most popular media player available on the internet. It's simple, fast and one of the powerful media player. It plays almost everything such as MPEG-2, DivX, H.264, MKV, WebM, WMV, MP3 and many more. You can download and use it on any platform like Windows, Linux, Mac OS X, Unix, so overall it's an freeware with no spyware, no ads and no user tracking. 
Fix-Building-Font-Cache-Error-VLC-Media-Player
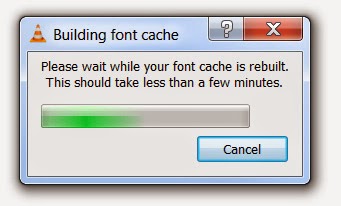
In-spite of this VLC media player can also convert one media file into other media also file also. And if you want to stream any movie in your VLC player then you can do it easily without any issue. But as we know nothing is perfect, while using VLC media player some users face an issue that is "Building Font Cache Error" while trying to play any media file. It's a little frustrating issue as it takes a lot of time in building vlc font cache also sometime it can hang your VLC media player also. But don't to worry you can get rid from vlc building font cache error in just few clicks. Just follow the steps given below carefully in order to fix this error.


Why I Am Facing Building Font Cache Error In VLC ?

Most of users face this issue when they install VLC media player on their system for the first time. It happens almost every time when you first play VLC player with any file after its installation. While sometime this pop up is shown even after playing many files. The main reason is that VLC rebuilds font cache to show subtitles for your files which are shown at the bottom of file's screen while playing it. While some time you can face this issue due to old version of your VLC media player. So always be sure that your VLC media player is updated to latest version.


How To Fix VLC Building Font Cache Error

  • Open your VLC media player.
  • Now go to Tools >> Preferences. You can use shortcut key Ctrl+P also in order to open Preferences.
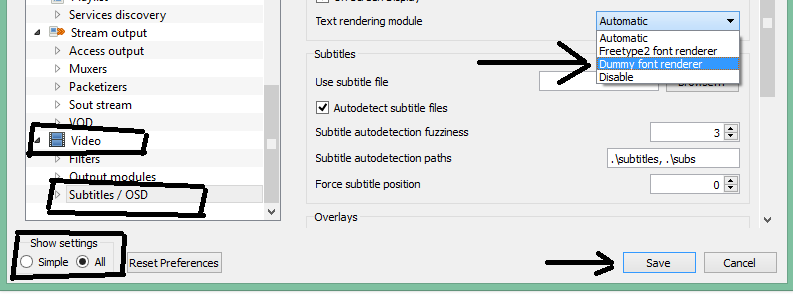
  • A new window will open, at the left side in the bottom you will see "Show Settings" with two options that is Simple and All.
  • Switch from Simple Setting to All Setting.
  • Now navigate to Video >> Subtitles/OSD and change the “Text rendering module” to “Dummy font rendering function”.
Fix-Building-Font-Cache-Error-VLC
  • Just click on Save button to make changes and restart your VLC media player and that's it. You will not face this problem again.
Must Read :-
igfxpers.exe What It Is And How To Disable It
Earn/Make Money By Downloading Apps With TapCash 
How To Change/Refresh Facebook Home Page Login Screen 

So this was all about how to solve/fix building font cache error in VLC media player. If you have any doubt, query or another working method then feel free to mention it below in the comment section.
Share:

domingo, 1 de marzo de 2015

igfxpers.exe What It Is And How To Disable It

 You might have noticed igfxpers.exe process running in the task manager. It's a little bit difficult task to understand which program it belongs to. Don't take tension it's not a virus, malware or spyware. Igfxpers.exe is a process that provides configuration options for Nvidia graphics cards. It's neither a virus file nor a system file. This process is from Intel, when you install Nvidia Graphic card or any other Graphic card then at that time this process is installed. It's not an essential window process so you can disable it to save your memory and to stop annoying pop up messages. 
igfxpers-exe-What-It-Is-And-How-To-Disable-It
Keep in mind that disabling this process may prevent the Nvidia graphics card from working properly. But if you want to increase booting time of your computer then just disable it. 

Its function includes enabling display resolution settings to persist when a monitor is disconnected or turned off; without it, according to Intel, the display would lose its resolution every time it was turned off. Intel says it is critical to proper running of the display driver as a whole and should not be shut off (Source : Neuber). 


How To Disable igfxpers.exe Process

As I told above that this process is not a virus or malware, you're completely safe from it. But still if you think that this process is consuming or eating system resources then you can easily disable it. 
  • Press Window Key+R to open Run, now type msconfig in the text field and hit enter.
  • Now move to Startup Tab and then uncheck "Intel common User Interface and click on Apply to save changes.
  • And that's it, you will no longer see this process in your task manager.
So this was all about how to disable igfxpers.exe process in task manager. If yo have any query or doubt then feel free to leave a comment below in the comment section.
Share:

martes, 24 de febrero de 2015

[Solved] Fix Hotspot Shield Not Working/Connecting Problem

 You might be aware about Hotspot shield as you have landed on this article to fix hotspot shield not working problem. Hotspot shield is one of the best rated VPN(Virtual Private Network) software to secure your online presence. It allows you to surf anonymously, unblock any website and hide your online presence. You can use it for your internet safety and privacy. This will secure your browsing, Wi-Fi hotspots, apps, your identity and your IP address to stop unwanted tracking. You can easily unblock any content and service or some social media websites such as Facebook, Skype, YouTube, Flickr and other sites not available in certain countries. 
Fix-Hotspot-Shield-Not-Working-Problem
Also Hotspot Shield Compression saves bandwidth and thus speeds up your browsing speed. It also saves your internet data up to a large extent. 

However on some system people are not able to install it properly due to some reasons. So to solve your problem I have mentioned the reason which causes this error to occur and ways to fix it.

Why I Am Having Hotspot Shield Not Working Error ?

There can be several reasons which causes this error to occur but I have mentioned some most common's one here : 
  • You might be having two or more VPN software installed on your system. At that time all these virtual private networks tries to configure their settings according to them but one or more VPN fails to set up its setting on your system. At that time this error is shown up.
  • You might be having a firewall which is not allowing Hotspot Shield to access traffic. Always be sure that your firewall is allowing HSS to access internet and traffic.
  • Sometime your antivirus software doesn't allow HSS to access traffic then HSS will show this error. Always be sure that your antivirus is allowing hotspot shield to access internet.
These are some of the most common reasons which you can check before going to the below mentioned tip to solve hotspot shield not working problem.

How To Fix Hotspot Shield Not Working Problem

This is a simple tip which you can use in order to run your HSS properly.
  • First of all download and install Hotspot Shield on your system and then it will open Hotspot Shield website in your browser, just copy the address from the address bar and save in anywhere on your system say Notepad.
  • Now if your having problem in connecting then just navigate to this path : Control Panel > Network Settings > LAN (Local Area Connection) > Properties
  • Now in the General tab you will see an option, "Hotspot Shield Helper Driver", just uncheck the box in-front of it and save the settings.
  • Now open your internet browser again and paste the address that you copied and hit enter.
  • Just try to connect your HSS again, hope it will start working.
So this was all about how to solve hotspot shield doesn't work problem. If you are still not able to connect it, then feel free to leave a comment below.
Share:

lunes, 23 de febrero de 2015

[Solved] Fix Windows Update Error 0x80070103 In Windows 8/NT

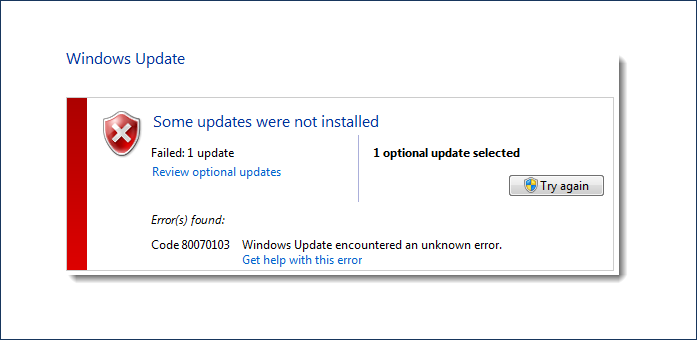
You might have come across this error "Windows Update Error 0x80070103" in Windows 8 or Windows NT while updating your system to new updates. This is one of the most common issue which occurs when a user tries to install updates in their Windows 8 or Windows NT. If you're one of those users who is facing this error then don't worry after reading this guide you will be able to remove it easily. I have mentioned all the reasons which causes this error to occur. Read the guide carefully and follow the steps mentioned.
Fix-Windows-Update-Error-0x80070103-In-Windows-8-NT

Error Codes Which Occur During This Windows Update Error

There are mainly two error codes which are shown up by your windows and they are maintained also on the official website of Microsoft. 
  • WindowsUpdate_80070103
  • 0x80070103

Why I Am Having Windows Update Error 0x80070103 ?

There can be several reasons that can cause this problem but some of the most common reasons I have mentioned here :
  • You might be trying to install a driver which already exists on your system, at that time this problem will occur.
  • While sometime you are trying to install a driver which is less compatible with its version already installed on your system.

How To Fix/Solve Windows Update Error 0x80070103

Just follow the step by step process to get rid of this error :
  • Search for control panel on your system or press Window Key+ R and then type "Control Panel" and hit enter.
  • This will open control panel on your window. Now click on "Windows Update".
  • Now If you have important updates to hide, click the link that says “important updates are available”.
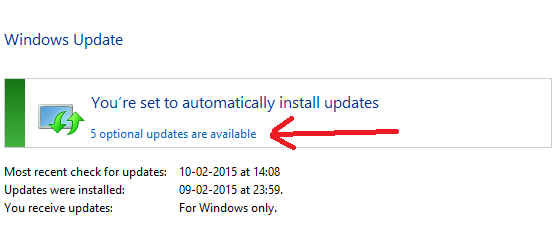
  • If you have optional updates to hide, click the link that says “optional updates are available”. As you can see in the screenshot below there is written "5 optional updates are available".
Optional-Windows-Update
  • Now select the update which you want to hide, right click on it and click on "Hide Update". Do this for all those updates which you want to hide.
Now we will need to disable auto-update of driver installation, just follow the steps to disable auto-update of driver installation.
  • Go to your desktop, right-click on My computer and select properties.
  • Now from the left menu click on "Advance system settings". It will open System Properties Window.
  • In the System Properties windows select "Hardware" and the tap on the "Device Installation Settings".
  • Now select “No let me choose what to do” and then select “Never install driver software from Windows Update”. Click Save Changes button to save the settings and that's it.
After following all the steps mentioned. you will be able to solve this error. In-spite of this if you are not able to solve this then leave a comment below or Search the forums or ask a question on the Microsoft Community website.
Share:

martes, 17 de febrero de 2015

[Solved] Fix PXE-E53 No Boot Filename Received Error

Recently my friend's computer stopped working suddenly and showed an error PXE-E53: No boot filename received on his computer screen. My friend was not having any type of technical skills so he asked me to solve this problem on my own or contact any professional technician. It was a little bit difficult task for me because this error was new for me. But before contacting to any professional I tried to search for this bug on my own. And finally at the end I was able to fix it just because of Internet.
fix-pxe-e53-no-boot-filename-received-error
I searched for all the possible ways that can cause this error or bug and then started applying them one by one and then one of them worked for me. So I thought to write about this error so that people are easily able to find its solution at a single place. 

Let me make you sure one thing that it's a very difficult task to tell that what's the main reason of this error. There can be several type of issues that can make this error to arise. But in this guide I have covered almost all the errors and their solution.

Why I Am Seeing PXE-E53 No Boot Filename Received Error?

If you are a little bit expert in technical skills then you can answer it very easily. The reason is simple. your PC or Laptop was unable to find any boot device so it started showing this error no boot filename received. As there was no boot device so it stuck with last option that is PXE server as you are not using it. 


How To Fix PXE-E53 No Boot Filename Received Error

As I said above that we can't exactly tell what's the main reason behind this error. We will have to check all the possible issues one by one that can cause this problem to occur. And don't think that your hard drive is crashed and your whole data will be lost. There can be dust in your hard drive which can force this error to occur. 

1. Check Your Hard Drive
In most of the cases you will be able to find the solution of this error in your hard drive only. Sometime due to dust, your hard drive stops working then your computer doesn't get any boot device. Due to it monitor shows this error. 

First of all open your CPU and check whether your hard drive is working or dead. If it's dead then sorry to say but this was the problem. If it's not dead then now remove your hard drive and connect it to another computer and if it's showing hard drive in that computer then there should be dust in your hard drive. Remove all the dust and start diagnosis test. If it will be successful then your data is not lost, it's safe.

2. Check Boot Settings
Sometime your boot drive option can be changed. Go to your boot menu by pressing F1 or F8 or ESC depending on your manufacturer and then check whether your first boot device is hard drive or not. If its' not then change the order. Remember first boot device is hard drive. Say first boot is now CD drive then change it to hard drive otherwise you will need a disk in your CD drive to take boot from CD drive.

3. Check All Connections
If there will be any loose connection then fix it tightly otherwise your hardware devices will not work properly. Check all the connection between your hard drive and mother board and make ensure that there is not any short circuit. It is recommend to check all the connections by using new cables.

4. Look For Dust
Search for a blower and then clean the dust wherever your see such as mother board, hard drive etc.

5. Check Mother Board
If nothing worked from all the above mentioned tips then there should be problem in your mother board. Try to clean dust properly from your mother board and check all the cable connections properly. Hope this will work for you.
Share:

miércoles, 11 de febrero de 2015

[Solved] Fix Google Chrome Has Stopped Working

 At present Google Chrome is the best browser for Windows operating system in the market. As it's the one of the top and best browser so it is required that it should be free from all the bugs and errors. Developers try their to remove any type of bug in Google Chrome by providing latest updates. In spite all the efforts of developers sometime Google Chrome faces lots of problems. I have seen many users saying that their Google Chrome showed error something like "Google Chrome Has Stopped Working" and after that they were not able to use it.
fix-google-chrome-has-stopped-working
Daily thousand of users faces this error with Google Chrome. But don't worry I have found all the possible ways to fix or solve this error.


How To Solve Google Chrome Has Stopped Working Error

There can be many bugs which are not allowing your Google Chrome to work properly. I have covered almost all the errors and ways to fix them. 

1. Delete Preferences File
This error occurs when you make some changes in your Google Chrome browser. Those changes can sometime cause errors and then your Google Chrome browser will not work properly or will shutdown accidentally. You can fix this error by following steps given below.

For Windows:
  • Simply navigate to this location C:/Users/Your_Username/AppData/Local/GoogleChrome/User/Data/Default.
  • There you will see a file called "Preferences", just right click on it and delete it. 
For Mac:
  • Simply navigate to this location Users/Your_Username/Library/Application Support/Google/Chrome/Default.
  • Simply delete the file "Preferences" from the list.
Note:- Here your Your_Username is your computer name or your account name. 

2. Check For Conflicting Software
Sometime there can be any software that is known to cause Google Chrome to crash. You can check for conflict software by typing chrome://conflicts into your Google Chrome address bar. If there will be any software that is causing Google Chrome to crash then it will be highlighted on this page. You will be shown conflict software and ways also to take any action. In most of the faces it's an malware which should be removed with anti-virus software or program. 

3. Check Problem With Protected System Files
Sometime Google Chrome crashes due to problem in protected system files. So to fix this follow the steps given below.
  • Press Windows Key+ R to open Run.  
  • Now enter the following command SFC.EXE /SCANNOW (There should be space between .EXE and /) in the Run.
  • This will enable Microsoft Utility and after that it will scan all the problems in your protected system files and fix it.
4. Clear Cookies And Disable Extensions, Apps
Clear Cookies:
  • Click on the top right side corner button (That three line button) in your Google Chrome browser and click on Settings.
  • Now scroll to the end of the page then click on show advanced settings.
  • Now click on Content settings, now there you will see a option All cookies ans site data below the Cookies menu.
  • Click on it and then simply remove all the cookies by pressing remove all button.
Disable Unwanted Extensions:
  • Type chrome://extensions in your Google Chrome browser.
  • Now disable all the unwanted extensions.
Disable Unwanted Apps:
  • Type chrome://apps in your Google Chrome browser.
  • Right click on any unwanted app and remove it.
5. Reset Google Chrome
Some by just resetting your Google Chrome to its initial point can solve your problem.
  • Click on the top right side corner button (That three line button) in your Google Chrome browser and click on Settings.
  • Now scroll to the end of the page then click on show advanced settings.
  • At the end of the page you will see a option Reset Settings.
  • Click on it to reset your Google Chrome.
6. Turn Off Sandbox
Sand box is a tool which is used to secure Google Chrome browser. Sometime you might not be able to see webpage correctly due to sandbox. So now you will need to turn off it. 
  • Go to your desktop and right click on Chrome shortcut.
  • Select properties and then go to shortcut tab.
  • Now just add this "-no-sandbox" at the end of path.
  • This might help you to recover your Google Chrome.
Inspite all these if your problem is not solved then just try to update your browser or reinstall it. This will surely solve your problem.


Share:

Popular Posts

Con la tecnología de Blogger.